







Advertising [Product3rdColumn]
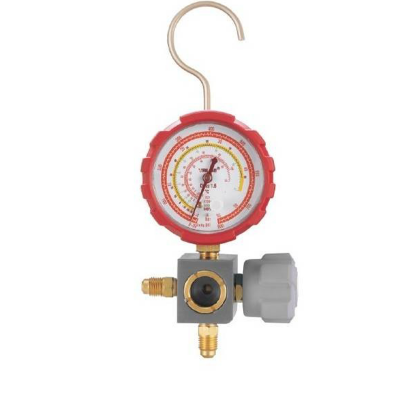
Manometer analyzer 1 way high display 68mm R410A R407C R32 R134A
Analog manometer 1 way value
Gas type: R410A, R407C, R32, R134a.
Pressure: High
Gauge diameter: 68mm
Sight glass: yes
IMPORTANTE: No se aceptan devoluciones de compresores ni unidades condensadoras. Asegúrese que producto necesita antes de realizar su compra.

* How to use a gas analyzer:
When performing a gas charge, we will need several measuring devices and some tools.
There are several methods for adjusting the refrigerant charge as well as the mechanism when charging equipment.
First and foremost as the main element we will need a pressure analyzer, normally a two-valve analyzer is used, but we must note that four and five-valve analyzers also exist on the market.
The analyzer consists of two valves, one for low pressure (low pressure) and another for high pressure (high pressure). Two pressure gauges, one blue in color that will indicate low pressure, its range is usually 0 to 10 bar and incorporates several scales in relation to pressure-temperature of the most characteristic gases (R 22, R 134a, R 407C), the other gauge will be red in color, this will indicate high pressure, its range is usually 0 to 30 bar, and as in the case of the low pressure gauge it also incorporates several temperature scales for the gases mentioned above.
The analyzer consists of three SAE ¼ threaded couplings for gases such as R 22, R 134a, R 404 and R 407C, for R 410C gas we must use 5/16 threaded couplings since it works at higher pressures. In these three threads, hoses will be connected that will link the low pressure side of the refrigeration equipment to the low pressure gauge (blue) on one side, the high pressure side of the refrigeration equipment to the high pressure gauge (red) on the other, and a hose connected to the center thread that will be used as a service hose that will be yellow in color, in this yellow hose the refrigerant gas bottle will be connected. It also incorporates a sight glass where the passage of refrigerant fluid can be visualized.
First, a series of precautions will be followed, checking that in all couplings there are no damaged threads, dirt, dust, oil or grease. It will be verified that in the sight glasses of the gauges there is no dust, if so a clean cloth will be used, under no circumstances will it be cleaned with aggressive detergents or disinfectants.
Second, the hoses will be purged. The yellow hose is connected to the refrigerant bottle which will be closed. The low pressure (blue) hose is connected to the refrigeration system. The bottle is opened. When the hoses are filled with gas, the air is purged from them. We will perform the same operation for the high pressure (red) hose.
The charge can be made by low or by high:
By low pressure (pure or azeotropic gases)
The yellow hose is connected to the refrigerant gas bottle, purged and the system is saturated with gas, once the pressures equalize the refrigeration equipment is started and the low pressure valve of the analyzer is opened so that the system itself introduces the gas into the equipment. The bottle can be heated to increase the temperature and in turn the pressure and this way we will achieve introducing gas more quickly.
This method is the most used since you can continuously measure the superheat and subcooling that the refrigeration circuit offers and you can adjust it without needing to know the final weight of refrigerant, another of the indicators that will help us know if the charge is appropriate will be the compressor consumption intensity as well as the temperature differences that we can measure in the heat exchangers.

feedback Report comment